Boards aka influencer CRM is a Trello-like solution to manage all your (potential) influencers, collaborations, and contracts in one place. Additionally, you can use the CRM to chat with influencers and monitor their collaboration content.
Here’s a step-by-step guide on how it works:
1. Using boards and columns
2. Adding notes, labels, and attachments
3. Influencer view
4. Messaging influencers
5. Tracking collaboration content
6. Team collaboration tools

1. Using boards & columns
▸ Creating a new board
To create a new board, simply just click on “Create a new board”

▸ Deleting boards and columns
To create a new board, simply just click on “Create a new board”

To delete a column, click on the three dots on top right, then choose “Delete column”.

▸ Naming a board/column
To set a name for your board/column or rename it, open a board and click on the current name. If it turns black, you can just write a new name for it.
▸ Moving columns and influencers
You can easily drag and drop your columns to change the order of them. For that, just click and hold a column you want to move, then drag it to the place you want.
Btw! You can move your influencers in a column the same way.
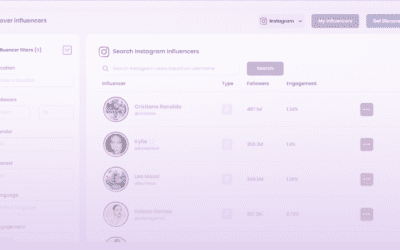
▸ Adding influencers to a board
To add influencers to a board, click “Add influencers” where you have the option to add an Instagram, TikTok, or YouTube account by their profile URL or username

▸ Moving columns and influencers
You can easily drag and drop your columns to change the order of them. For that, just click and hold a column you want to move, then drag it to the place you want.
Btw! You can move your influencers in a column the same way.
2. Adding notes, labels, and attachments
For every influencer, you can add notes, labels, and attachments that won’t be seen by influencers. Those are good for remembering small details about your collaboration partners: for example their birthday, product preferences, collaboration progress, and so on.

▸ Notes
To add a note for someone, just open up an influencer’s profile in a board and click on “Add a note”.
PS! If you have an influencer on more than just one board, you can see the same notes for them on each.

▸ Labels
The difference between notes and labels is that you can see labels directly on your board – this makes it easier to organise your influencers and keep track of the collaboration progress.
You can manage your labels when you go to a board and click on “Labels” on top right, then choose “Manage labels”.

Make sure to click “Save” once you’ve created a label!
You can create multiple labels and add them to influencers. Just click on an influencer and on the left you can see “Labels”. Click on “Edit” to apply labels for them.

3. Influencer view
After you’ve added an influencer to a board, you can click on them and the influencer’s insights view opens. On the left you can see their account analytics, notes and labels you’ve added (those can’t be seen by the influencer but only your team). On the right side you can chat with them, see detailed analytics of their account, contact and shipping information, as well as share comments with your team.

That’s how an influencer’s profile looks on Promoty
4. Messaging influencers
Our influencer chat allows you to replace endless emails and direct messages on different social media channels with one in-app chat – so you can manage all your influencer communications in one place.
▸ If the influencer has Promoty app installed, they’ll see your messages on their app.


▸ If the influencer doesn’t have Promoty app, you’ll need to add their email address and your message will be sent to their email inbox.

That’s how an influencer sees your message sent from Promoty in their email inbox
5. Tracking collaboration content
To keep track of all the content posted by your influencers, click on “Content” in the top middle of your board.
There you can enter your campaign or brand hashtag which’s content you’d like to keep your eyes on.
PS! You can only add one hashtag per board and only content posted by influencers in that board will be tracked.

6. Team collaboration tools
To make sure everyone from your team can keep track of the brand’s relationships with influencers, you can add as many members as you want to your team and share comments with them directly on the platform.
▸ Adding team members
To add members to your team, click on the + sign on top right of the page. Then invite them to join by email.


▸ Sharing comments about an influencer with your team
To share comments about an influencer with your team, just click on the influencer and choose “Team comments” on the top right. The comments will only be visible to your team, not the influencer.

If you have any questions, we’re always happy to give you all the answers via [email protected].